Single Sign On (OIDC)
Syncplify Server! supports single sign on through OpenID Connect (OIDC). Any standards compliant identity provider works, including Google, Microsoft Entra ID, Okta, Keycloak, Authentik, and self hosted providers. This page explains everything in one place: where SSO applies, how the flow works, what every provider setting means, and step by step configuration for Google and Microsoft Entra ID, the two providers our customers use most.
Where SSO applies
SSO can be enabled independently for three different audiences, each with its own provider list and its own callback path:
| Audience | Configured in | Callback path | License |
|---|---|---|---|
| SuperAdmins | SuperAdmin UI: Global Configuration, Single Sign On section | /superadmin/sso/callback | Professional or higher |
| Virtual site administrators | SuperAdmin UI: virtual site editor, SSO Providers tab | /admin/sso/callback | Professional or higher |
| End users (WebClient and file transfer) | Admin UI: LDAP / OIDC, OIDC providers tab | /webclient/sso/callback | Ultimate |
The three provider lists are completely separate: a provider configured for SuperAdmins cannot be used by end users, and vice versa. If you want the same identity provider to serve more than one audience, configure it in each place (you can reuse the same client registration at the identity provider, as long as every callback URL is registered there).
NOTE
Trial licenses include all SSO capabilities, so you can evaluate everything before purchasing.
How the sign in flow works
Syncplify Server! implements the OIDC authorization code flow with PKCE. When someone selects an SSO provider on a sign in screen:
- The server discovers the provider's endpoints from the issuer URL (unless you configured them manually, see below) and redirects the browser to the provider's authorization endpoint.
- The person authenticates at the provider (with whatever factors the provider enforces) and is redirected back to the callback URL with a one time authorization code.
- The server exchanges the code for an ID token, validates the token's signature against the provider's published keys, and verifies the issuer, the audience, the nonce, and the expiry.
- The verified identity claims are matched to a local account (see Mapping identities to accounts) and a session is issued.
Syncplify Server! never sees the person's password at the identity provider, and accounts are never created automatically: an account must already exist and be bound to the provider before it can sign in.
The redirect URL you must register
This is the single most common source of configuration trouble. Every OIDC provider requires you to register the exact redirect URL (also called redirect URI or callback URL) that it is allowed to send users back to. For Syncplify Server! that URL is:
https://<your server host>[:port]<callback path>using the callback path from the table above. For example, a WebClient provider on files.example.com needs https://files.example.com/webclient/sso/callback registered at the identity provider, character for character.
By default the server derives this URL from the incoming request (honoring X-Forwarded-Proto and X-Forwarded-Host from trusted reverse proxies). If your deployment sits behind proxies or load balancers that make the derived URL differ from what you registered, set the provider's Redirect URL setting to the exact registered value and the server will use it verbatim.
Provider settings reference
Every provider editor (in all three configuration places) offers the same settings.
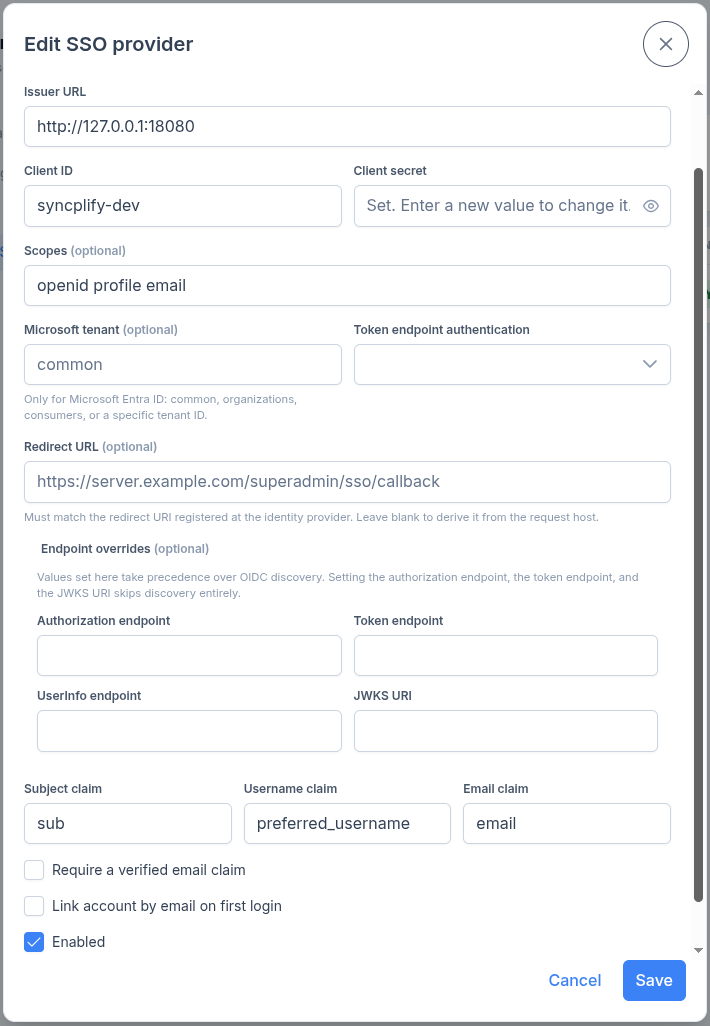
Basics
- Display name: the label shown on the sign in button. Required.
- Issuer URL: the provider's OIDC issuer, for example
https://accounts.google.com. The server appends/.well-known/openid-configurationto this URL to discover the provider's endpoints, and validates that ID tokens were issued by it. Required. - Client ID and Client secret: the OAuth client credentials issued by the provider when you registered the application. The secret is stored encrypted and is never shown again; when editing, leave it untouched to keep the current value.
- Scopes: the OAuth scopes requested during authorization, space separated. The default
openid profile emailis right for almost every provider. - Enabled: whether the provider appears on the sign in screen.
Microsoft tenant
Only meaningful for Microsoft Entra ID. Accepts common, organizations, consumers, or a specific tenant ID (a GUID). It controls which token issuers are accepted:
- With a specific tenant ID, only tokens issued by that tenant are accepted, even if the issuer URL points at the
commonendpoint. This is the recommended setting for a single organization. - With
common,organizations, orconsumers, tokens from any matching Entra ID tenant are accepted. Combine this with per account bindings (or a carefully considered link by email policy) because it means any Microsoft account of that class can complete the sign in flow at the provider.
Leave the field empty for every provider that is not Microsoft Entra ID.
Token endpoint authentication
How the server proves its client identity when exchanging the authorization code:
- Client secret in POST body (
client_secret_post): the default; works with Google, Microsoft, and most providers. - Client secret in Basic auth header (
client_secret_basic): select this for providers that require HTTP Basic authentication at the token endpoint.
Redirect URL
An explicit override of the callback URL, used verbatim in the flow. Leave it blank to derive the URL from the request host; set it when the derived value does not match what you registered at the provider (see the section above).
Endpoint overrides
Four optional fields: Authorization endpoint, Token endpoint, UserInfo endpoint, and JWKS URI. Values set here take precedence over whatever OIDC discovery returns, and when the authorization endpoint, the token endpoint, and the JWKS URI are all set, discovery is skipped entirely.
You do not need these for Google, Microsoft, or any provider with working discovery. They exist for providers that do not publish a discovery document, publish incorrect values in it, or are reachable only through special URLs.
The UserInfo endpoint is queried (with the access token) only when the ID token does not carry all the claims the provider is configured to use; the identity's subject always comes from the verified ID token.
Claims mapping
- Subject claim: the claim used as the stable, unique identifier of the external identity. Default
sub, which is correct for virtually all providers. Account bindings store and compare this value. - Username claim: the claim recorded as the username hint. Default
preferred_username. - Email claim: the claim used as the account email candidate. Default
email. This is also the claim used by link by email. - Groups claim: the claim that carries group membership, for example
groups. Optional.
Security options
- Require verified email: reject the sign in when the provider does not assert that the email address is verified (the
email_verifiedclaim). Turn it on for Google. Leave it off for Microsoft Entra ID, which never emits that claim, otherwise every sign in fails. - Link account by email on first login: see Mapping identities to accounts below.
- Allow insecure HTTP issuer: permit
http://URLs for the issuer and the endpoints. Only for test identity providers on isolated networks; leave it off in production.
NOTE
The Auto provision accounts option visible in the end user provider editor is reserved for a future release and has no effect yet: accounts are never created automatically.
Testing a provider
Every provider list offers a Test action that resolves the provider's effective endpoints (running OIDC discovery when applicable) and reports the result. Run it after saving a provider to catch unreachable issuers and issuer mismatches before anyone tries to sign in.
Mapping identities to accounts
An external identity is matched to a local account through the account's SSO binding: every SuperAdmin, administrator, and end user account can be bound to one provider, with an optional subject.
- Match by subject: when the binding has a subject, the account matches only the external identity whose subject claim equals it exactly. This is the most precise binding, but providers like Google and Microsoft use opaque subject values that you cannot know before the first sign in.
- Link by email on first login: when the provider has Link account by email on first login enabled and a binding has no subject yet, the account is matched by comparing the verified email claim with the account's email address (case insensitively). On the first successful sign in the subject is captured and stored in the binding, and from then on the account matches by subject. This is the practical way to onboard Google and Microsoft users: create the account, set its email, select the SSO provider, and leave the subject empty.
Accounts also control how SSO combines with other authentication:
- SuperAdmins and administrators have an Authentication mode: local password, SSO, or both.
- Every binding offers Require local MFA after SSO, which asks for the account's local one time password on top of a successful SSO sign in.
- End user accounts of type OIDC authenticate exclusively through SSO in the WebClient. For file transfer protocols such as SFTP and FTPS, which cannot run an interactive browser flow, they use app passwords.
Configuring Google
- Open the Google Cloud Console, select or create a project, and go to APIs & Services, then Credentials.
- If prompted, configure the OAuth consent screen first (an app name and support email are enough; choose Internal if your organization uses Google Workspace and only your users should sign in).
- Select Create credentials, then OAuth client ID, and choose Web application as the application type.
- Under Authorized redirect URIs add your callback URL, for example
https://files.example.com/webclient/sso/callback(see the table above for the right path for each audience). - Create the client and copy the Client ID and Client secret.
Then create the provider in Syncplify Server! with these settings:
| Setting | Value |
|---|---|
| Issuer URL | https://accounts.google.com |
| Client ID | the client ID from step 5 |
| Client secret | the client secret from step 5 |
| Scopes | openid profile email (the default) |
| Microsoft tenant | leave empty |
| Token endpoint authentication | Client secret in POST body (the default) |
| Endpoint overrides | leave empty (discovery works) |
| Claims | leave the defaults |
| Require verified email | on |
| Link account by email on first login | on (recommended) |
Google does not send a username claim, so identification effectively happens through the email address; with link by email enabled, an account whose email matches the Google account's verified email signs straight in on first use.
Configuring Microsoft Entra ID
- Open the Azure portal, go to Microsoft Entra ID, then App registrations, and select New registration.
- Give it a name, and under Supported account types pick who may sign in; for a single organization choose Accounts in this organizational directory only.
- Under Redirect URI choose the Web platform and enter your callback URL, for example
https://files.example.com/webclient/sso/callback. - Register the application, then from its Overview page copy the Application (client) ID and the Directory (tenant) ID.
- Go to Certificates & secrets, create a New client secret, and copy its Value immediately (it is shown only once).
Then create the provider in Syncplify Server! with these settings:
| Setting | Value |
|---|---|
| Issuer URL | https://login.microsoftonline.com/common/v2.0 or https://login.microsoftonline.com/<tenant ID>/v2.0 |
| Client ID | the Application (client) ID from step 4 |
| Client secret | the secret value from step 5 |
| Scopes | openid profile email (the default) |
| Microsoft tenant | your Directory (tenant) ID (recommended), or common |
| Token endpoint authentication | Client secret in POST body (the default) |
| Endpoint overrides | leave empty (discovery works) |
| Claims | leave the defaults |
| Require verified email | off (see the warning below) |
| Link account by email on first login | on (recommended) |
WARNING
Microsoft Entra ID never sends the email_verified claim, so Require verified email must stay off for Entra ID providers or every sign in will be rejected. To keep the configuration safe, pin your tenant in the Microsoft tenant field instead: it guarantees that only identities from your own directory are accepted, even when the issuer URL points at the common endpoint.
IMPORTANT
Entra ID client secrets expire (24 months at most). When sign ins suddenly fail with an invalid client error, check the secret's expiry in Certificates & secrets and rotate it, then update the provider's client secret.
Other providers
Any OIDC provider with a standard discovery document works exactly like the examples above: set the issuer URL, the client credentials, and register the callback URL at the provider. For nonstandard providers:
- If discovery is unavailable or wrong, fill in the endpoint overrides.
- If the provider requires HTTP Basic authentication at the token endpoint, switch the token endpoint authentication accordingly.
- If your test provider only speaks plain HTTP, enable Allow insecure HTTP issuer (never in production).
Troubleshooting
- The provider shows an error like
redirect_uri_mismatchbefore asking for credentials. The callback URL the server sent does not match what is registered at the provider. Register the exact URL, or set the provider's Redirect URL setting to the registered value. Watch out forhttpvshttps, ports, and trailing characters. - "OIDC discovery issuer mismatch" when testing or signing in. The issuer in the provider's discovery document does not match the configured issuer URL. Copy the issuer exactly as the provider publishes it. For Entra ID, make sure the issuer ends in
/v2.0and the Microsoft tenant field is set consistently. - Sign in succeeds at the provider but Syncplify Server! rejects it as unauthorized. No local account matched the identity. Check that the account exists, is enabled, allows SSO in its authentication mode, is bound to the right provider, and either has the correct subject or qualifies for link by email (link by email enabled on the provider, empty subject in the binding, matching email address).
- Every Entra ID sign in is rejected after the provider succeeds. Almost always Require verified email left on (Entra ID never asserts it), or an expired client secret.
- Sign ins fail only for some Microsoft users. If the Microsoft tenant is pinned, users from other tenants are rejected by design.
- Token validation fails intermittently. Check the server clock; a skew of up to two minutes is tolerated, more is not.
- The provider is only reachable over HTTP. Enable Allow insecure HTTP issuer for test setups, or front the provider with TLS for production.
If a provider still misbehaves, run its Test action and read the reported endpoints: they show exactly what the server resolved through discovery and overrides.